


〇、测试框架的核心作用
测试框架是软件开发中用于标准化、自动化、高效执行测试工作的工具集合与规范体系,核心作用是解决 “测试流程混乱、重复劳动多、结果难管理” 等问题,让测试工作从 “零散手动操作” 转向 “系统化工程”,最终保障软件质量并提升测试效率。
它主要做了以下 4 件核心事:
1. 统一测试规范,减少 “混乱成本”
不同测试人员可能用不同方式写用例、命名文件、记录结果,框架会定义统一规则:
-
规定用例结构(如 “前置条件 - 测试步骤 - 预期结果” 的固定模板);
-
统一代码风格(如函数命名、变量定义,尤其自动化测试中);
-
约束测试数据管理(如把测试数据单独存放在配置文件 / 数据库,而非硬编码到用例中)。
例:Python 的
pytest框架要求测试函数以test_开头,确保框架能自动识别用例,避免因命名不统一导致用例漏执行。
2. 自动化执行测试,替代 “重复手动操作”
这是框架最核心的价值之一,尤其针对回归测试(软件迭代后,重复验证旧功能是否正常):
- 自动识别用例:框架能扫描指定目录下符合规范的用例(如
JUnit识别带@Test注解的方法),无需人工逐个执行; - 自动模拟用户 / 系统操作:自动化框架(如 UI 测试的
Selenium、接口测试的Postman/Newman)可模拟点击按钮、发送请求、对比响应等操作,替代人工在页面 / 工具上的重复操作; - 批量执行与定时执行:支持一次性运行成百上千条用例,还可结合调度工具(如 Jenkins)实现 “每晚自动执行全量测试”,无需人工值守。
3. 简化测试辅助工作,降低 “技术门槛”
测试中需要大量辅助操作(如准备测试环境、处理异常、生成报告),框架会封装这些能力,让测试人员无需重复编写基础代码:
- 前置 / 后置处理:自动执行 “测试前启动服务、初始化数据”(如
@BeforeMethod)和 “测试后清理数据、关闭服务”(如@AfterMethod),避免每个用例都写重复代码; - 异常捕获与重试:自动捕获用例执行中的错误(如接口超时、元素找不到),部分框架(如
pytest-rerunfailures)支持自动重试失败用例,减少 “偶发故障” 误判; - 自动生成报告:执行完成后,框架(如
Allure、TestNG)自动生成包含 “用例通过率、失败原因、执行耗时” 的可视化报告,无需人工整理。
4. 整合生态工具,实现 “全流程覆盖”
单一框架无法满足所有测试需求,它会提供接口整合其他工具,覆盖从 “测试准备” 到 “缺陷追踪” 的全流程:
- 测试数据:整合 Excel/CSV/数据库工具,快速读取测试数据;
- 环境管理:整合 Docker,自动拉起 / 销毁测试环境;
- 缺陷追踪:整合 Jira,用例失败时自动创建缺陷工单;
- 持续集成:整合 Jenkins/GitLab CI,将测试嵌入 “代码提交 - 构建 - 测试 - 部署” 的流水线,实现 “代码提交后自动触发测试”。
总之,测试框架的核心是 “提效、降本、保质量”—— 通过标准化和自动化,减少人工重复劳动,让测试人员聚焦于 “设计高质量用例” 而非 “执行繁琐操作”,同时确保测试结果可追溯、可信任。
一、Pytest 介绍
Pytest 是 Python 生态中最流行、最强大的自动化测试框架之一,以简洁的语法、丰富的功能和高度的可扩展性著称。它支持单元测试、集成测试、功能测试等多种测试类型,广泛应用于开发和测试场景,帮助开发者快速发现代码缺陷、保障代码质量。
相比 Python 内置的 unittest 框架,pytest 具备以下关键优势,也是其被广泛采用的核心原因:
| 优势类别 | 具体描述 |
|---|---|
| 语法极简 | 无需继承类(如 unittest.TestCase),仅需定义以 test_ 开头的函数 / 方法即可编写测试用例,代码量大幅减少。 |
| 自动发现用例 | 遵循约定优于配置(Convention over Configuration):自动识别以 test_ 开头的文件、函数、类和方法作为测试用例,无需手动注册。 |
| 丰富的断言 | 支持 Python 原生语法的断言(如 assert a == b、assert len(list) > 0),无需记忆 self.assertEqual() 等专用方法,且断言失败时会显示详细的差异信息(如变量实际值、预期值)。 |
| 参数化测试 | 通过 @pytest.mark.parametrize 装饰器,可轻松实现 “一套逻辑测试多组数据”,避免重复编写相似用例。 |
| 强大的夹具(Fixtures) | 替代传统的 setUp()/tearDown() 方法,提供更灵活的测试资源管理(如初始化数据库连接、创建测试数据、清理环境),支持依赖注入、作用域控制(函数级、类级、模块级、会话级)。 |
| 可扩展性强 | 拥有庞大的插件生态(超过 800 个官方 / 第三方插件),可覆盖测试报告、并行执行、接口测试、UI 测试等场景。 |
| 兼容友好 | 完全兼容 unittest 编写的用例,也支持 doctest 格式的测试,迁移成本极低。 |
二、Pytest 的基本用法
2.1 安装 Pytest
1. 在命令行中运行以下命令:
pip install -U pytest
2. 检查是否安装了正确的版本:
$ pytest --version
pytest 8.4.2
2.2 创建 Pytest 测试用例
2.2.1 测试用例相关命名规范
Pytest 主要通过命名来识别测试用例,以下是核心命名规则:
(一)文件命名
要创建以 test_ 开头的文件,这类文件会被 Pytest 视为包含测试用例的文件,例如 test_calculator.py,Pytest 会在运行时扫描此类文件以发现测试内容。
(二)类命名
需创建以 Test 开头的类,在这样的类中,可定义测试方法,像 class TestMathOperations:,Pytest 会将该类里符合要求的方法识别为测试用例的一部分。
(三)函数或方法命名
要创建以 test_ 开头的函数或方法。比如:
def test_a():  # 函数形式的测试用例
    pass

class Test:
    def test_b(self):  # 类中方法形式的测试用例
        pass
2.2.2 Pytest 测试用例的核心特点
(一)用例识别逻辑
Pytest 把每一个以 test_ 开头的函数或类中的方法,都当作一个测试用例。这意味着每个这样的函数或方法都会被单独执行,方便对不同功能点进行针对性测试。
(二)命名的关键作用
Pytest 主要依靠名字来区分普通函数(方法)和测试用例。只有符合 test_ 开头(函数 / 方法)、Test 开头(类)、test_ 开头(文件)这些命名规则的,才会被判定为测试用例相关的组件,普通的、不符合命名规则的函数或类则不会被当作测试用例执行。
2.2.3 Pytest 的使用方式
(一)启动方式
在命令行中,直接输入 pytest 命令,即可启动 Pytest 框架。Pytest 会自动扫描当前目录及子目录下符合命名规范的测试文件、类和方法,然后执行相应的测试用例。
(二)输出内容
执行 pytest 后,它会输出详细的测试用例相关信息,包括用例的收集情况(即找到多少个符合要求的测试用例)、执行过程(每个用例是成功还是失败等),以及最终的汇总结果(总共有多少用例通过、失败等统计数据),帮助测试人员清晰了解测试的整体情况。
2.3 断言
在 Python 编程世界中,断言(assert)是一个看似简单却功能强大的调试工具。它不仅能帮助开发者在开发阶段快速验证假设,还能在测试环节中发挥关键作用,成为代码质量的守护者。
断言本质上是一种条件验证机制,其核心语法结构为:
assert 条件表达式, 错误提示信息
当 Python 解释器执行到断言语句时,会首先评估条件表达式:
- 如果条件为真(
True),程序继续正常执行,断言语句仿佛不存在 - 如果条件为假(
False),则立即抛出AssertionError异常,并将错误提示信息作为异常描述
这个过程相当于以下代码的简化版,但更加简洁高效:
if not 条件表达式:
    raise AssertionError(错误提示信息)
2.3.1 断言的适用场景
1. 开发阶段的假设验证
在开发复杂系统时,我们经常会对程序状态做出假设。断言可以将这些假设显式化:
def calculate_average(numbers):
    # 确保输入列表不为空
    assert len(numbers) > 0, "计算平均值需要至少一个数据"
    return sum(numbers) / len(numbers)
这段代码中,断言确保了函数不会在空列表上执行除法操作,提前暴露潜在问题。
2. 单元测试中的结果验证
在单元测试框架(如 unittest 或 pytest)中,断言是验证功能正确性的核心手段:
def test_addition():
    result = 2 + 3
    assert result == 5, "2 + 3 应该等于 5"

def test_string_concatenation():
    result = "Hello" + " " + "World"
    assert result == "Hello World", "字符串拼接结果不正确"
测试框架会捕获断言异常,并将其转化为清晰的测试失败报告。
3. 函数参数合法性检查
断言可用于验证函数输入参数是否符合预期:
def withdraw_money(account, amount):
    # 确保取款金额为正数
    assert amount > 0, "取款金额必须为正数"
    # 确保账户余额充足
    assert account.balance >= amount, "账户余额不足"
    account.balance -= amount
2.3.2 断言的高级用法
1. 结合数据类型检查
断言可以与 isinstance() 函数结合,验证变量类型:
def process_user_data(age):
    assert isinstance(age, int), "年龄必须是整数类型"
    assert age >= 0 and age <= 120, "年龄必须在合理范围内"
    # 处理年龄数据...
2. 调试复杂数据结构
对于列表、字典等复杂数据结构,断言可以验证其内部状态:
def analyze_sales_data(sales):
    # 确保销售数据是字典类型且不为空
    assert isinstance(sales, dict) and sales, "销售数据格式不正确"
    # 确保所有销售记录都是正数
    for product, revenue in sales.items():
        assert revenue >= 0, f"{product}的销售额不能为负数"
    # 分析销售数据...
2.3.3 断言的局限性与最佳实践
尽管断言功能强大,但也有其局限性:
-
断言可以被禁用: 当 Python 解释器使用
-O(优化)选项运行时,所有断言都会被忽略。因此,断言不能用于验证程序正常运行所必需的条件。 -
不要用于输入验证: 对于用户输入或外部数据,应使用常规的异常处理(
try-except),而不是断言。 -
错误信息要具体: 良好的错误信息能大幅提高调试效率:
# 不推荐 assert len(data) == 10 # 推荐 assert len(data) == 10, f"数据长度应为10,实际为{len(data)}" -
单一职责原则: 每个断言应只验证一个条件,避免复杂的逻辑表达式。
2.3.4 断言与异常处理的区别
很多开发者会混淆断言和常规异常处理,其实它们有明确的分工:
- 断言: 用于验证 "必须为真" 的内部假设,主要用于开发和测试阶段
- 异常处理: 用于处理可能发生的预期错误,如文件不存在、网络连接失败等
# 断言:验证内部逻辑正确性
def calculate_total(items):
    assert all(isinstance(item, (int, float)) for item in items), "所有项目必须是数字"
    return sum(items)

# 异常处理:处理可能发生的外部错误
def read_config_file(filename):
    try:
        with open(filename, 'r') as f:
            return f.read()
    except FileNotFoundError:
        print(f"错误:配置文件 {filename} 不存在")
        return None
2.4 解读 Pytest 结果
pytest 会通过颜色、符号和文字清晰区分测试的不同状态,同时提供汇总报告帮助快速定位问题。
2.4.1 核心测试状态标识
pytest 用不同符号和颜色(终端默认开启颜色)区分测试结果,是解读的基础。
| 符号 | 状态名称 | 含义说明 | 常见原因 | 终端颜色 |
|---|---|---|---|---|
. |
Passed | 测试通过 | 断言条件成立,代码行为符合预期 | 绿色 |
F |
Failed | 测试失败 | 断言条件不成立(如 assert 1 == 2)、代码抛出未捕获的异常 |
红色 |
E |
Error | 测试错误 | 测试用例本身代码有误(如语法错误、导入失败),而非业务逻辑断言失败 | 红色 |
s |
Skipped | 测试跳过 | 用 @pytest.mark.skip 或 @pytest.mark.skipif 主动跳过 |
黄色 |
x |
XFailed | 预期失败 | 用 @pytest.mark.xfail 标记 “已知会失败” 的用例,实际确实失败(符合预期) |
黄色 |
X |
XPassed | 预期失败但实际通过 | 用 @pytest.mark.xfail 标记的用例,实际运行却通过(不符合预期,需关注) |
蓝色 |
p |
Passed (参数化) | 参数化测试中的通过用例 | 多组参数中,某组参数的测试通过 | 绿色 |
f |
Failed (参数化) | 参数化测试中的失败用例 | 多组参数中,某组参数的测试失败 | 红色 |
2.4.2 典型 pytest 输出结构解析
以一个包含 5 个测试用例的项目为例,输出结构通常分为 用例执行详情 和 汇总报告 两部分:
1. 用例执行详情(逐行输出)
collected 5 items  # 第一步:收集到的测试用例总数

tests/test\_math.py::test\_add PASSED  # 单个用例结果:文件路径::用例名 状态

tests/test\_math.py::test\_subtract FAILED  # 失败用例,后续会显示具体错误

tests/test\_math.py::test\_multiply ERROR  # 错误用例,后续会显示错误栈

tests/test\_math.py::test\_divide SKIPPED (reason: 暂不测试除法)  # 跳过用例及原因

tests/test\_math.py::test\_mod XFAILED (reason: 已知取模逻辑待修复)  # 预期失败用例
2.4.3 错误 / 失败详情(关键定位信息)
对于 FAILED 或 ERROR 的用例,pytest 会输出 错误类型、错误位置 和 上下文信息,例如:
============================================================== test session starts ===============================================================
platform win32 -- Python 3.13.7, pytest-8.4.2, pluggy-1.6.0
rootdir: D:\Workspace\pytest_study
collected 1 item

test_math.py F                                                                                                                              [100%]

==================================================================== FAILURES ====================================================================
_________________________________________________________________ test_subtract __________________________________________________________________

    def test_subtract():
        a = 10
        b = 3
>       assert a - b == 8  # 错误的断言:10-3=7≠8
        ^^^^^^^^^^^^^^^^^
E       assert (10 - 3) == 8

test_math.py:4: AssertionError
============================================================ short test summary info =============================================================
FAILED test_math.py::test_subtract - assert (10 - 3) == 8
=============================================================== 1 failed in 0.07s ================================================================
============================================================== test session starts ===============================================================
platform win32 -- Python 3.13.7, pytest-8.4.2, pluggy-1.6.0
rootdir: D:\Workspace\pytest_study
collected 1 item

test_math.py F                                                                                                                              [100%]

==================================================================== FAILURES ====================================================================
_________________________________________________________________ test_multiply __________________________________________________________________

    def test_multiply():
        a = 5
        b = "2"  # 错误:将字符串与数字相乘
>       assert a * b == 10
E       AssertionError: assert (5 * '2') == 10

test_math.py:4: AssertionError
============================================================ short test summary info =============================================================
FAILED test_math.py::test_multiply - AssertionError: assert (5 * '2') == 10
=============================================================== 1 failed in 0.08s ================================================================
2.4.4 汇总报告(核心统计)
执行完所有用例后,pytest 会输出汇总报告,包含 总耗时、用例状态分布 和 关键提示:
import pytest


# 7个通过的测试
def test_add():
    assert 2 + 3 == 5


def test_divide():
    assert 10 / 2 == 5


def test_modulus():
    assert 10 % 3 == 1


def test_power():
    assert 2 ** 3 == 8


def test_floor_division():
    assert 10 // 3 == 3


def test_negative_numbers():
    assert -5 + 3 == -2


def test_zero_operations():
    assert 0 * 5 == 0


# 1个失败的测试
def test_subtract():
    a = 10
    b = 3
    assert a - b == 8  # 错误:10-3=7≠8


# 1个错误的测试
def test_multiply():
    a = 5
    b = "2"  # 错误:字符串不能与整数相乘
    assert a * b == 10


# 1个跳过的测试
@pytest.mark.skip(reason="尚未实现复数乘法")
def test_complex_multiply():
    assert (2 + 3j) * (4 + 5j) == (-7 + 22j)


# 1个预期失败的测试
@pytest.mark.xfail(reason="已知浮点数精度问题")
def test_float_precision():
    assert 0.1 + 0.2 == 0.3  # 由于浮点数精度问题会失败
============================================================== test session starts ===============================================================
platform win32 -- Python 3.13.7, pytest-8.4.2, pluggy-1.6.0
rootdir: D:\Workspace\pytest_study
collected 11 items

test_math.py .......FFsx                                                                                                                    [100%]

==================================================================== FAILURES ====================================================================
_________________________________________________________________ test_subtract __________________________________________________________________

    def test_subtract():
        a = 10
        b = 3
>       assert a - b == 8  # 错误:10-3=7≠8
        ^^^^^^^^^^^^^^^^^
E       assert (10 - 3) == 8

test_math.py:37: AssertionError
_________________________________________________________________ test_multiply __________________________________________________________________

    def test_multiply():
        a = 5
        b = "2"  # 错误:字符串不能与整数相乘
>       assert a * b == 10
E       AssertionError: assert (5 * '2') == 10

test_math.py:44: AssertionError
============================================================ short test summary info =============================================================
FAILED test_math.py::test_subtract - assert (10 - 3) == 8
FAILED test_math.py::test_multiply - AssertionError: assert (5 * '2') == 10
=============================================== 2 failed, 7 passed, 1 skipped, 1 xfailed in 0.12s ================================================
2.5 Pytest 常用参数
下表整理了 pytest 日常测试中最常用的核心参数,涵盖执行控制、输出展示、调试辅助、标记筛选等关键场景,便于快速查阅和使用。
| 参数分类 | 参数 / 命令 | 功能说明 | 示例 |
|---|---|---|---|
| 基础执行 | 无参数(直接指定文件 / 目录) | 执行指定测试文件、目录下的所有测试用例;若不指定,默认执行当前目录及子目录用例 | pytest test_login.py(执行单个文件)pytest tests/(执行目录下所有用例) |
-v / --verbose |
详细模式,展示每个测试用例的执行结果(成功 / 失败 / 跳过)及额外信息 | pytest -v test_user.py |
|
-q / --quiet |
安静模式,仅展示简要结果(如总用例数、失败数),减少冗余输出 | pytest -q tests/ |
|
-x / --exitfirst |
遇到第一个测试失败时立即停止执行,适合快速定位早期问题 | pytest -x test_payment.py |
|
--maxfail=num |
允许指定数量的失败用例,达到数量后停止执行(比 -x 更灵活) |
pytest --maxfail=3(失败 3 个后停止) |
|
| 用例筛选 | -k "表达式" |
按用例名称筛选,支持模糊匹配、逻辑运算(and/or/not) |
pytest -k "login and not admin"(执行含 “login” 且不含 “admin” 的用例) |
-m "标记名" |
执行被 @pytest.mark.标记名 装饰的用例(需先定义标记,如 @pytest.mark.smoke) |
pytest -m smoke(执行 “冒烟测试” 用例) |
|
-s / --capture=no |
禁用输出捕获,显示用例中 print() 等语句的打印内容(便于调试) |
pytest -s test_debug.py |
|
-lf / --last-failed |
仅重新执行上一次运行失败的用例(快速复现失败场景) | pytest -lf |
|
-ff / --failed-first |
优先执行上一次失败的用例,后续再执行其他用例 | pytest -ff |
|
| 输出与报告 | --tb=样式 |
控制失败用例的回溯(Traceback)信息展示样式:-short:简短回溯- long:完整回溯(默认)- no:隐藏回溯- line:仅显示出错行 |
pytest --tb=short(简化失败信息) |
--junitxml=路径 |
生成 JUnit 格式的 XML 报告,用于集成到 Jenkins 等 CI/CD 工具 | pytest --junitxml=reports/result.xml |
|
--cov=模块名 |
结合 pytest-cov 插件,统计指定模块的代码覆盖率 |
pytest --cov=app(统计 app 模块覆盖率) |
|
--cov-report=格式 |
控制覆盖率报告的输出格式(需配合 --cov):- term:终端文本(默认)- html:HTML 报告- xml:XML 报告 |
pytest --cov=app --cov-report=html(生成 HTML 覆盖率报告) |
|
| 调试辅助 | -pdb |
当用例失败时,自动进入 Python 调试器(pdb),便于断点调试 | pytest -pdb test_failed.py |
--trace |
逐行执行所有用例,每次执行前暂停并进入调试器(适合精细调试) | pytest --trace test_detail.py |
|
| 环境与配置 | -c 配置文件 |
指定自定义的 pytest 配置文件(默认读取 pytest.ini/tox.ini 等) |
pytest -c my_pytest.ini |
-n 数量 / --numprocesses=数量 |
结合 pytest-xdist 插件,多进程并行执行用例(加速大规模测试) |
pytest -n 4(用 4 个进程执行用例) |
|
| 特殊场景 | --version |
查看当前 pytest 的版本信息 | pytest --version |
-h / --help |
查看所有 pytest 参数的详细帮助文档(含插件扩展参数) | pytest -h |
2.6 Pytest 插件
pytest 的核心优势之一在于其高度可扩展的插件生态。通过插件,我们可以轻松增强 pytest 的功能,例如生成美观的测试报告、并行执行测试用例、自动重跑失败用例等,从而大幅提升测试效率和体验。
2.6.1 插件管理
pytest 插件的管理主要围绕 “安装”“查看”“卸载” 三个核心操作展开,常用工具为 pip(Python 包管理工具),同时 pytest 也提供了内置命令辅助查看插件信息。
1. 插件的安装
pytest 插件本质是 Python 包,因此通过 pip 即可完成安装,通用命令格式如下:
# 安装指定插件(以 pytest-html 为例)
$ pip install pytest-html

# 安装指定版本的插件(如需兼容旧版本 pytest,可指定版本号)
$ pip install pytest-html==3.2.0

# 从 requirements.txt 批量安装插件(适合团队协作场景)
# 需先在 requirements.txt 中列出插件,如:pytest-html==3.2.0、pytest-xdist==3.3.1
$ pip install -r requirements.txt
注意:部分插件可能依赖特定版本的 pytest 或 Python,安装前建议查看插件官方文档(通常在 PyPI 或 GitHub 主页),确认兼容性。
2. 插件的查看
安装插件后,可通过 pytest 内置命令查看已安装的插件列表及详情,帮助确认插件是否正常加载:
# 查看所有已安装的 pytest 插件(包含核心插件和第三方插件)
$ pytest --trace-config

# 查看其中的 plugins 参数的插件
$ pytest -v
3. 插件的卸载
当插件不再使用时,可通过 pip uninstall 命令卸载,避免占用环境资源:
# 卸载指定插件(以  pytest-html 为例)
$ pip uninstall pytest-html -y  # -y 表示自动确认卸载,无需手动输入 y
4. 插件的启用与禁用
部分场景下(如调试时需排除插件干扰),无需卸载插件,可临时启用 / 禁用指定插件:
# 运行测试时,仅启用 pytest-html 和 pytest-cov 插件
$ pytest -p pytest_html -p pytest_cov

# 运行测试时,禁用 pytest-xdist 插件(其他插件正常加载)
$ pytest -p no:pytest_xdist

# 禁用所有第三方插件,仅使用 pytest 核心功能
$ pytest -p no:plugins
2.6.2 常用第三方插件
pytest 生态中有数百款第三方插件,覆盖测试报告、并行执行、失败重跑、代码覆盖率等多种场景。以下是工业界最常用的几款插件,包含其核心功能、使用方式及配置说明。
pytest 官方插件列表(https://docs.pytest.org/en/stable/reference/plugin_list.html)是由 pytest 核心团队维护的权威插件目录,它按照功能类别系统整理了社区中常用且经过验证的 pytest 插件,为开发者提供了便捷的插件筛选和参考渠道。
1. pytest-html
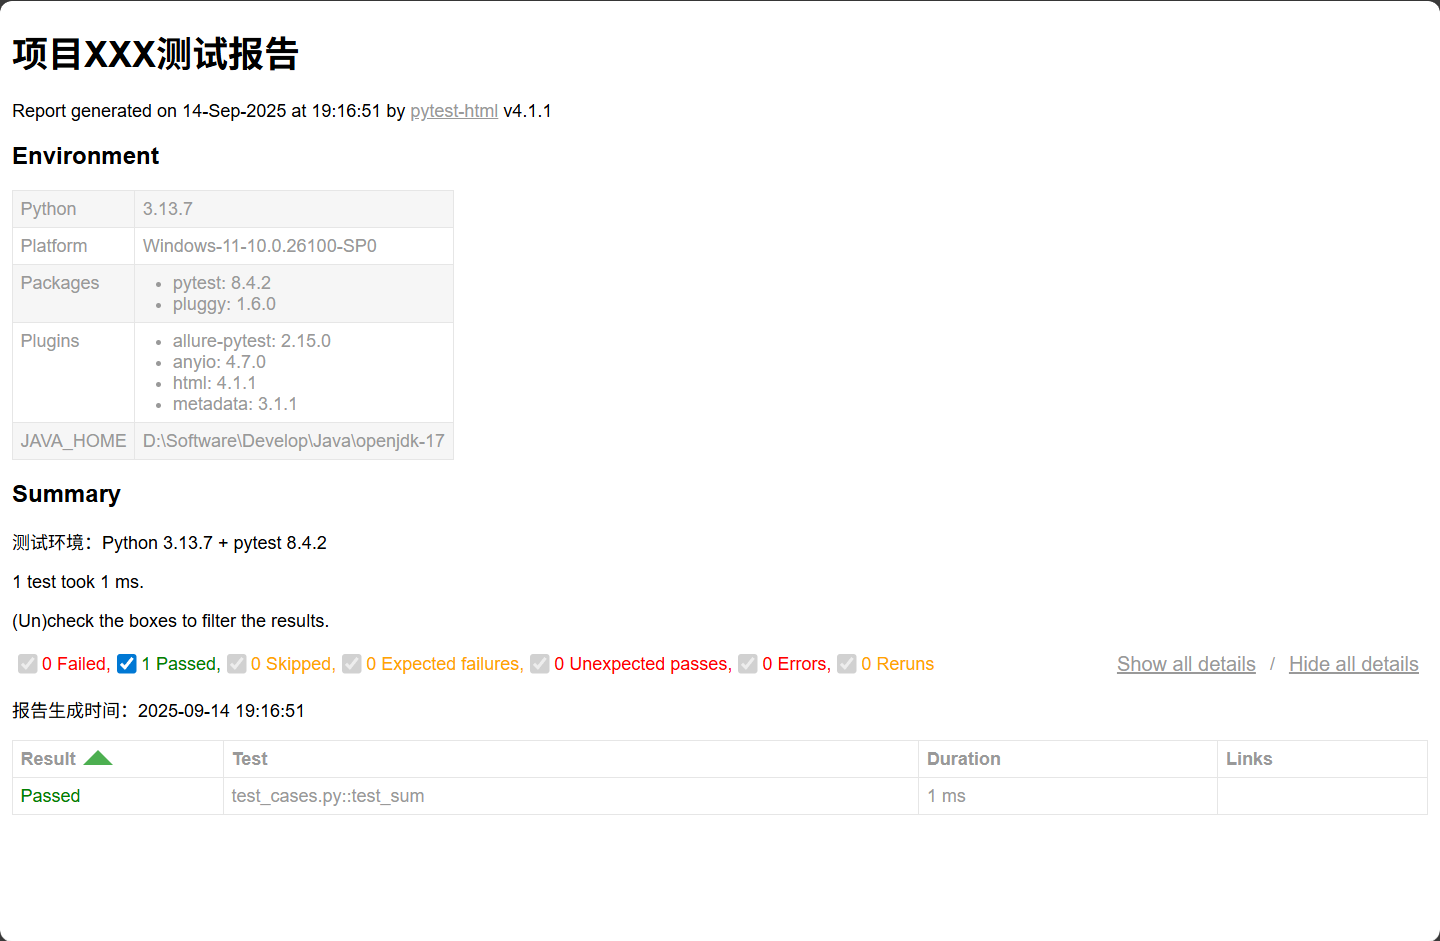
pytest-html 将测试结果以美观、易读的 HTML 页面展示,支持显示测试用例名称、执行时间、失败原因(含堆栈信息)、截图(需手动集成)等,便于团队共享和问题定位。
# 安装 pytest-html
$ pip install pytest-html

# 执行测试生成报告到 reports 目录下,文件名为 test_report.html
$ pytest --html=reports/test_report.html

# 生成 “独立报告”(避免报告依赖外部 CSS/JS 文件,便于邮件发送)
$ pytest --html=reports/test_report.html --self-contained-html
在 conftest.py 中通过 pytest_html_report_title 和 pytest_html_results_summary 钩子可以实现自定义报告标题 / 描述:
import platform, datetime, pytest


# conftest.py
def pytest_html_report_title(report):
    report.title = "项目XXX测试报告"  # 自定义报告标题


def pytest_html_results_summary(prefix, summary, postfix):
    prefix.extend([f"<p>测试环境:Python {platform.python_version()} + pytest {pytest.__version__}</p>"])  # 自定义报告头部信息
    postfix.extend([f"<p>报告生成时间:{datetime.datetime.now().strftime('%Y-%m-%d %H:%M:%S')}</p>"])  # 自定义报告尾部信息
2. pytest-xdist
pytest-xdist 基于多进程 / 多线程实现测试用例并行执行,大幅缩短测试总耗时(尤其适合用例数量多、单用例执行时间长的场景)。其原理是将测试用例分配到多个 CPU 核心上同时运行,默认按 “测试函数” 粒度拆分。
# 安装 pytest-xdist
$ pip install pytest-xdist

# 自动分配进程数(推荐,充分利用 CPU 资源)
$ pytest -n auto

# 手动指定 4 个进程并行执行
$ pytest -n 4
注意:并行执行时,需确保测试用例之间无依赖关系(如避免用例 A 依赖用例 B 的执行结果或数据),以防出现数据污染或执行失败;同时,部分需要单进程上下文的插件(如
pytest-rerunfailures)不直接支持,需进行特殊配置以实现兼容。
3. pytest-rerunfailures
pytest-rerunfailures 的功能实在测试用例执行失败后,自动重新运行指定次数,帮助区分 “偶发失败”(如网络波动、资源竞争导致)和 “必然失败”(如代码逻辑错误),减少误判。
# 安装 pytest-rerunfailures
$ pip install pytest-rerunfailures

# 失败用例自动重跑 2 次(总执行次数:1次正常执行 + 2次重跑 = 3次)
$ pytest --reruns 2

# 失败用例重跑 2 次,每次重跑间隔 5 秒(避免短时间内重复请求导致的问题)
$ pytest --reruns 2 --reruns-delay 5

# 仅对标记为 "flaky"(不稳定)的用例重跑 2 次
$ pytest -m flaky --reruns 2
4. pytest-cov
pytest-cov 是一款用于统计代码覆盖率的 pytest 插件,能够检测测试用例对代码的覆盖程度,具体包括行覆盖率(被执行的代码行数)、函数覆盖率(被调用的函数数量)和分支覆盖率(被执行的条件分支情况),并支持生成文本、HTML、XML 等多种格式的可视化报告,帮助开发者发现未被测试覆盖的代码死角。
# 安装 pytest-cov
$ pip install pytest-cov

# 统计当前目录下的代码覆盖率,在控制台输出文本报告
$ pytest --cov=.

# 统计当前目录,同时生成 HTML 报告(路径:htmlcov/)和 XML 报告(用于 Jenkins 集成)
$ pytest --cov=. --cov-report=html:htmlcov --cov-report=xml:cov.xml
也可以通过 setup.cfg 或 pytest.ini 配置默认覆盖率规则(避免每次命令行输入复杂参数):
# pytest.ini
[pytest]
testpaths = tests  # 测试用例目录
python_files = test_*.py  # 测试文件命名规则
addopts = --cov=src --cov-report=html:htmlcov  # 默认启用覆盖率统计并生成 HTML 报告
cov_omit =  # 排除无需统计的文件/目录(如配置文件、测试代码)
    src/config/*
    src/utils/__init__.py
cov_fail_under = 80  # 覆盖率低于 80% 时,测试执行失败(强制团队提升覆盖率)
5. pytest-mock
pytest-mock 基于 Python 内置的 unittest.mock 封装,提供更简洁的 API 用于 “模拟外部依赖”(如数据库连接、第三方接口、复杂函数),确保单元测试仅关注 “被测代码逻辑”,不受外部环境影响。
# 安装 pytest-mock
$ pip install pytest-mock
在测试函数中通过 mocker 参数(pytest-mock 注入的 fixture)创建 Mock 对象,模拟外部依赖:
# 被测代码:src/utils.py
import requests

def get_user_info(user_id):
    # 调用第三方接口获取用户信息(外部依赖)
    response = requests.get(f"https://api.example.com/users/{user_id}")
    return response.json()

# 测试代码:tests/test_utils.py
def test_get_user_info(mocker):
    # 1. Mock requests.get 方法,避免真实调用第三方接口
    mock_get = mocker.patch("src.utils.requests.get")

    # 2. 定义 Mock 的返回值(模拟接口返回的用户信息)
    mock_get.return_value.json.return_value = {
        "user_id": 123,
        "name": "张三",
        "age": 25
    }

    # 3. 调用被测函数
    result = get_user_info(123)

    # 4. 断言结果是否符合预期
    assert result["user_id"] == 123
    assert result["name"] == "张三"

    # 5. 断言 requests.get 被正确调用(验证入参)
    mock_get.assert_called_once_with("https://api.example.com/users/123")
常用 Mock 方法:
mocker.patch(target):模拟指定对象(如函数、类、方法)。mocker.spy(target):监听指定对象的调用,不替换其实现(用于记录调用次数和入参)。mocker.create_autospec(target):创建与目标对象 “接口一致” 的 Mock(避免调用不存在的方法)。
三、Pytest 的高级用法
3.1 mark(标记)
pytest 中的 mark 功能是一个非常强大的特性,它允许你对测试函数进行标记和分类,以便更灵活地选择和运行测试。下面我将详细介绍内置 mark 和自定义 mark 的使用方法。
3.1.1 内置 Mark
pytest 提供了一些常用的内置 mark,无需额外配置即可使用:
1. skip: 无条件跳过测试
import pytest

@pytest.mark.skip(reason="暂时不需要运行这个测试")
def test_example():
    assert 1 == 1
2. skipif: 满足条件时跳过测试
import sys
import pytest

@pytest.mark.skipif(sys.version_info < (3, 8), reason="需要 Python 3.8 或更高版本")
def test_python38_feature():
    # 使用 Python 3.8+ 的特性
    pass
3. xfail: 预期测试会失败
import pytest

@pytest.mark.xfail(reason="已知这个测试目前会失败")
def test_known_failure():
    assert 1 == 2  # 这会失败,但会被标记为 xfail 而非 error
4. parametrize: 参数化测试,允许用不同参数多次运行同一个测试
import pytest

@pytest.mark.parametrize("input, expected", [
    (1, 2),
    (2, 3),
    (3, 4),
])
def test_increment(input, expected):
    assert input + 1 == expected
3.1.2 自定义 Mark
除了内置的 mark,你还可以创建自己的自定义 mark 来对测试进行分类。
步骤 1: 定义自定义 Mark
需要在项目根目录的 pytest.ini 或 setup.cfg 文件中注册自定义 mark,避免 pytest 警告:
[pytest]
markers =
    slow: 标记需要长时间运行的测试
    integration: 标记集成测试
    database: 标记需要数据库连接的测试
步骤 2: 使用自定义 Mark
import pytest
import time

# 使用自定义的 slow 标记
@pytest.mark.slow
def test_long_running():
    # 模拟耗时操作
    time.sleep(5)
    assert True

# 使用自定义的 integration 标记
@pytest.mark.integration
def test_api_integration():
    # 测试 API 集成
    assert True

# 可以同时应用多个标记
@pytest.mark.database
@pytest.mark.integration
def test_database_integration():
    # 测试数据库集成
    assert True

# 结合内置标记和自定义标记
@pytest.mark.skipif(True, reason="暂时跳过")
@pytest.mark.database
def test_skipped_database_operation():
    assert False
步骤 3: 运行带有特定 Mark 的测试
使用 -m 选项可以只运行带有特定标记的测试:
# 只运行标记为 slow 的测试
pytest -m slow

# 运行标记为 integration 或 database 的测试
pytest -m "integration or database"

# 运行标记为 integration 但不标记为 slow 的测试
pytest -m "integration and not slow"
步骤 4: 查看所有可用的 Mark
使用 pytest --markers 命令可以查看所有注册的标记(包括内置和自定义):
pytest --markers
3.2 fixture(夹具)
pytest 的 fixture 是一种强大的测试工具,用于提供测试所需的资源(如数据库连接、临时文件、测试数据等),并在测试前后进行初始化和清理工作。它比传统的 setup/teardown 方法更灵活,支持依赖注入和复用。
在 pytest 中,fixture 的存放位置取决于其复用范围和使用场景,常见的存放方式有以下几种:
1. 与测试用例在同一个文件中
如果 fixture 仅用于当前文件内的测试用例,直接定义在测试文件(如 test_example.py)中即可,方便就近管理。
2. conftest.py 文件
这是 pytest 推荐的共享 fixture 的方式。conftest.py 是 pytest 专门用于存放共享工具(包括 fixture)的文件,无需手动导入,pytest 会自动识别。放在项目根目录的 conftest.py 中,fixture 可在整个项目范围内复用。放在子目录的 conftest.py 中,fixture 仅在该子目录及子目录下的测试文件中有效。
3. 单独的 Python 模块(如 fixtures/ 目录)
如果项目较大,fixture 数量多,可将其组织到单独的模块(如 fixtures/db.py、fixtures/data.py)中,然后在测试文件中通过 from fixtures.db import db_fixture 导入使用。
3.2.1 基本使用方法
1. 定义 fixture
使用 @pytest.fixture 装饰器定义一个 fixture 函数,该函数会返回测试所需的资源。 usefixtures 是 pytest 提供的一个装饰器,主要用于在不直接使用 fixture 返回值的情况下,让测试函数复用 fixture 中的逻辑:
import time
import pytest


@pytest.fixture
def sample_data():
    # 准备测试数据
    data = [1, 2, 3, 4, 5]
    return data


# 在测试函数中直接使用 fixture 名称作为参数
def test_sum(sample_data):
    assert sum(sample_data) == 15


# 记录测试执行时间的fixture
@pytest.fixture
def timer():
    # Setup: 记录开始时间
    start_time = time.time()
    print("\n测试开始")

    # 执行测试用例
    yield

    # Teardown: 计算并打印耗时
    end_time = time.time()
    print(f"\n测试结束,耗时: {end_time - start_time:.4f}秒")


# 使用usefixtures执行时间测量逻辑
@pytest.mark.usefixtures("timer")
def test_simple_operation():
    # 模拟一些操作
    time.sleep(0.1)  # 模拟100ms的操作
    assert 1 + 1 == 2
2. 带清理操作的 fixture
import pytest

@pytest.fixture
def database_connection():
    # 初始化操作:建立数据库连接
    print("\n建立数据库连接...")
    connection = "模拟数据库连接对象"

    yield connection  # 返回资源给测试用例

    # 清理操作:关闭数据库连接(测试后执行)
    print("\n关闭数据库连接...")

def test_database_query(database_connection):
    print(f"使用连接: {database_connection} 执行查询")
    assert True  # 实际测试中会有数据库操作的断言
运行后会看到执行顺序:
$ pytest -vs
============================================================== test session starts ===============================================================
platform win32 -- Python 3.13.7, pytest-8.4.2, pluggy-1.6.0
cachedir: .pytest_cache
rootdir: D:\Workspace\pytest_study
configfile: pytest.ini
collected 1 item

test_math.py::test_database_query
建立数据库连接...
使用连接: 模拟数据库连接对象 执行查询
PASSED
关闭数据库连接...


=============================================================== 1 passed in 0.01s ================================================================
3.2.2 Fixture 作用域(Scope)
fixture 可以通过 scope 参数指定作用域,控制其创建和销毁的时机:
@pytest.fixture(scope="module")  # 模块级别的 fixture
def module_data():
    print("\n初始化模块级数据")
    data = {"key": "module_value"}
    yield data
    print("\n清理模块级数据")
常用的作用域:
function:默认值,每个测试函数执行一次class:每个测试类执行一次module:每个模块执行一次package:每个包执行一次session:整个测试会话(运行一次 pytest)执行一次
3.3.3 Fixture 依赖
fixture 可以依赖其他 fixture,形成依赖链:
import pytest

@pytest.fixture
def config():
    # 基础配置
    return {"url": "https://api.example.com", "timeout": 10}

@pytest.fixture
def api_client(config):  # 依赖 config fixture
    # 基于配置创建 API 客户端
    client = f"API 客户端 (地址: {config['url']}, 超时: {config['timeout']})"
    return client

def test_api_call(api_client):
    print(f"使用 {api_client} 调用 API")
    assert True
3.3.4 参数化 Fixture
通过 params 参数可以创建参数化的 fixture,为测试提供多组数据:
import pytest

@pytest.fixture(params=[1, 2, 3])  # 三组参数
def number(request):  # 需要使用 request 参数获取当前值
    return request.param

def test_square(number):
    assert number * number == pow(number, 2)
运行后会生成 3 个测试用例,分别使用 1、2、3 作为参数。
3.3.5 自动使用的 Fixture
通过 autouse=True 可以让 fixture 自动应用到所有测试,无需显式声明:
import pytest
import time

@pytest.fixture(autouse=True, scope="function")
def timer():
    start = time.time()
    yield  # 测试函数会在这里执行
    end = time.time()
    print(f"\n测试耗时: {end - start:.2f}秒")

def test_quick():
    time.sleep(0.1)
    assert True

def test_slow():
    time.sleep(0.3)
    assert True
3.3 hook(钩子)
pytest 的 hook(钩子)机制是其核心扩展点,允许开发者通过定义特定函数来修改或增强 pytest 的默认行为。这些钩子函数在测试执行的不同阶段被 pytest 自动调用,从而实现定制化需求。
3.3.1 hook 的基本概念
- 作用:扩展 pytest 功能,如自定义测试收集、修改测试结果、添加命令行参数等。
- 定义位置:通常在
conftest.py文件中(pytest 会自动识别该文件中的钩子),也可在插件中定义。 - 命名规范:钩子函数以
pytest_开头,例如pytest_collection_modifyitems。
3.3.2 常用 hook 函数分类及示例
1. 测试收集相关
-
pytest_collection_modifyitems(session, config, items)
在测试用例收集完成后调用,可修改测试用例列表(如排序、过滤、重命名)。# conftest.py def pytest_collection_modifyitems(items): # 将测试用例按名称排序 items.sort(key=lambda x: x.name) # 打印收集到的测试用例 for item in items: print(f"收集到测试用例: {item.name}")
2. 测试执行相关
-
pytest_runtest_makereport(item, call)
生成单个测试用例的执行报告,可用于获取测试结果(成功 / 失败 / 跳过)。# conftest.py def pytest_runtest_makereport(item, call): if call.when == "call": # 测试用例执行阶段 if call.excinfo is not None: # 测试失败 print(f"测试用例 {item.name} 执行失败") -
pytest_runtest_setup(item)
在每个测试用例执行前调用,可用于前置操作(如初始化资源)。def pytest_runtest_setup(item): print(f"\n准备执行测试用例: {item.name}")
3. 命令行参数相关
-
pytest_addoption(parser)
添加自定义命令行参数,用于接收用户输入。# conftest.py def pytest_addoption(parser): # 添加 --env 参数,默认值为 "test" parser.addoption("--env", action="store", default="test", help="指定测试环境") -
pytest_configure(config)
在 pytest 配置完成后调用,可获取命令行参数并初始化全局配置。def pytest_configure(config): env = config.getoption("--env") print(f"当前测试环境: {env}")
4. 报告生成相关
-
pytest_terminal_summary(terminalreporter, exitstatus, config)
在测试结束后生成终端报告,可添加自定义统计信息。def pytest_terminal_summary(terminalreporter, exitstatus, config): # 统计失败用例数 failed = len(terminalreporter.stats.get("failed", [])) terminalreporter.write_line(f"\n自定义总结: 失败用例数 {failed}")
3.3.3 hook 的执行顺序
- 初始化阶段:
pytest_addoption→pytest_configure - 测试收集阶段:
pytest_collection_modifyitems - 测试执行阶段:
pytest_runtest_setup→pytest_runtest_makereport - 结束阶段:
pytest_terminal_summary
3.3.4 使用hook读取yaml测试用例
# test_data.yaml
# 测试用例名称:标识当前测试集的名称,便于识别测试场景
test_name: test_add

# 测试步骤/测试数据集合:包含多个测试用例条目
test_cases:
  # 第一个测试用例
  - a: 6       # 输入参数a的值
    b: 2       # 输入参数b的值
    c: 8       # 预期结果(通常是a和b经过某种运算后的期望输出,这里推测是a + b的结果)

  # 第二个测试用例
  - a: 3       # 输入参数a的值
    b: 5       # 输入参数b的值
    c: 8       # 预期结果(3 + 5 = 8)

  # 第三个测试用例(这个用例预期会失败,因为2 + 2 ≠ 5)
  - a: 2       # 输入参数a的值
    b: 2       # 输入参数b的值
    c: 5       # 预期结果(此处为故意设置的错误预期,用于验证测试框架能否检测到失败)
# test_add.py
# 导入yaml模块,用于解析YAML格式的测试数据文件
import yaml
# 导入pytest框架,用于编写和运行测试用例
import pytest


def load_test_cases():
    """加载YAML文件中的测试用例数据

    从test_data.yaml文件读取测试数据,提取其中的测试用例列表并返回
    企业中通常会在这里对文件路径和异常处理进行更完善的封装

    Returns:
        list: 包含多个测试用例字典的列表
    """
    # 使用with语句安全打开文件,自动处理文件关闭
    with open("test_data.yaml", "r") as f:
        # 解析YAML文件内容,返回一个字典
        test_data = yaml.safe_load(f)
    # 返回YAML中"test_cases"键对应的测试用例列表
    return test_data["test_cases"]


def pytest_generate_tests(metafunc):
    """pytest的钩子函数:实现测试用例的参数化

    当pytest收集测试函数时会自动调用此函数,用于动态生成测试参数
    这是pytest灵活扩展测试生成逻辑的核心机制之一

    Args:
        metafunc: 测试函数的元数据对象,包含测试函数的信息和参数
    """
    # 检查当前测试函数是否需要"test_case"这个参数
    if "test_case" in metafunc.fixturenames:
        # 调用加载函数获取所有测试用例
        test_cases = load_test_cases()
        # 对"test_case"参数进行参数化,将每个测试用例作为独立的测试实例
        metafunc.parametrize("test_case", test_cases)


def test_addition_operation(test_case):
    """测试加法运算:验证a + b的结果是否等于预期值c

    这是实际执行测试的函数,pytest会为每个测试用例生成一个独立的测试实例

    Args:
        test_case (dict): 单个测试用例数据,包含a、b、c三个键
    """
    # 从测试用例中提取输入参数a
    a = test_case["a"]
    # 从测试用例中提取输入参数b
    b = test_case["b"]
    # 从测试用例中提取预期结果c
    expected = test_case["c"]

    # 执行断言:验证实际结果是否等于预期结果
    # 自定义错误信息,便于快速定位问题
    assert a + b == expected, f"{a} + {b} 应该等于 {expected},但实际结果是 {a + b}"
$ pytest
============================================================== test session starts ===============================================================
platform win32 -- Python 3.13.7, pytest-8.4.2, pluggy-1.6.0
rootdir: D:\Workspace\pytest_study
configfile: pytest.ini
collected 3 items

test_math.py ..F                                                                                                                            [100%]

==================================================================== FAILURES ====================================================================
______________________________________________________ test_addition_operation[test_case2] _______________________________________________________

test_case = {'a': 2, 'b': 2, 'c': 5}

    def test_addition_operation(test_case):
        """测试加法运算:验证a + b的结果是否等于预期值c

        这是实际执行测试的函数,pytest会为每个测试用例生成一个独立的测试实例

        Args:
            test_case (dict): 单个测试用例数据,包含a、b、c三个键
        """
        # 从测试用例中提取输入参数a
        a = test_case["a"]
        # 从测试用例中提取输入参数b
        b = test_case["b"]
        # 从测试用例中提取预期结果c
        expected = test_case["c"]

        # 执行断言:验证实际结果是否等于预期结果
        # 自定义错误信息,便于快速定位问题
>       assert a + b == expected, f"{a} + {b} 应该等于 {expected},但实际结果是 {a + b}"
E       AssertionError: 2 + 2 应该等于 5,但实际结果是 4
E       assert (2 + 2) == 5

test_math.py:58: AssertionError
============================================================ short test summary info =============================================================
FAILED test_math.py::test_addition_operation[test_case2] - AssertionError: 2 + 2 应该等于 5,但实际结果是 4
========================================================== 1 failed, 2 passed in 0.20s ===========================================================
四、框架封装
4.1 日志记录
日志记录用于跟踪测试执行过程,方便问题定位。
# pytest.ini
[pytest]
# 实时输出日志到控制台
log_cli = true
# 日志级别
# DEBUG:详细的信息,通常只出现在诊断问题上
# INFO:确认一切按预期运行
# WARNING:一个迹象表明,一些意想不到的事情发生了,或表明一些问题在不久的将来(例如。磁盘空间低”)。这个软件还能按预期工作。
# ERROR:更严重的问题,软件没能执行一些功能
# CRITICAL:一个严重的错误,这表明程序本身可能无法继续运行
log_cli_level = INFO
# %(levelno)s: 打印日志级别的数值
# %(levelname)s: 打印日志级别名称
# %(pathname)s: 打印当前执行程序的路径,其实就是sys.argv[0]
# %(filename)s: 打印当前执行程序名
# %(funcName)s: 打印日志的当前函数
# %(lineno)d: 打印日志的当前行号
# %(asctime)s: 打印日志的时间
# %(thread)d: 打印线程ID
# %(threadName)s: 打印线程名称
# %(process)d: 打印进程ID
# %(message)s: 打印日志信息
log_cli_format = %(asctime)s [%(levelname)s] | %(filename)s:%(lineno)s | %(message)s
log_cli_date_format = %Y-%m-%d %H:%M:%S
# 日志文件路径
log_file = ./logs/pytest_log.log
# 文件日志级别
log_file_level = INFO
log_file_format = %(asctime)s [%(levelname)s] | %(filename)s:%(lineno)s | %(message)s
log_file_date_format = %Y-%m-%d %H:%M:%S
# test_log.py
import logging

def test_example():
    logging.info("这是 INFO 日志")
    logging.warning("这是 WARNING 日志")
    logging.error("这是 ERROR 日志")
    assert 1 == 1
$ pytest
============================================================== test session starts ===============================================================
platform win32 -- Python 3.13.7, pytest-8.4.2, pluggy-1.6.0
rootdir: D:\Workspace\pytest_study
configfile: pytest.ini
plugins: allure-pytest-2.15.0
collected 1 item

test_log.py::test_example
----------------------------------------------------------------- live log call ------------------------------------------------------------------
2025-09-12 17:06:52 [INFO] | test_log.py:4 | 这是 INFO 日志
2025-09-12 17:06:52 [WARNING] | test_log.py:5 | 这是 WARNING 日志
2025-09-12 17:06:52 [ERROR] | test_log.py:6 | 这是 ERROR 日志
PASSED                                                                                                                                      [100%]

=============================================================== 1 passed in 0.02s ================================================================
日志会输出在 ./logs/pytest_log.log:
2025-09-12 17:00:17 [INFO] | test_log.py:4 | 这是 INFO 日志
2025-09-12 17:00:17 [WARNING] | test_log.py:5 | 这是 WARNING 日志
2025-09-12 17:00:17 [ERROR] | test_log.py:6 | 这是 ERROR 日志
4.2 生成测试报告
配置 Java 和 Allure 的环境变量后可以使用 Allure 生成美观的测试报告。
1. 安装依赖:
$ pip install allure-pytest
2. 运行并生成报告:
$ pytest --alluredir=reports --clean-alluredir # 生成报告数据并清空历史数据
$ allure generate -o html_reports -c reports # 生成HTML报告
$ allure serve reports # 启动本地服务查看报告
4.3 一键执行脚本
-
配置文件方式
# pytest.ini [pytest] # 命令行参数:每次运行 pytest 时自动附加的参数 addopts = --alluredir=reports # 生成 Allure 报告数据到 reports 目录 --clean-alluredir # 清空旧的 Allure 报告数据 -v # 详细输出模式 -
Python 脚本方式
# run.py
import os
import pytest

if __name__ == "__main__":
    # 执行所有测试用例并生成allure报告
    pytest.main(["-v", "--alluredir=reports --clean-alluredir"])
    os.system("allure generate -o html_reports -c reports")
通过
run.py实现一键执行所有测试用例。
4.4 接口请求和断言
# test_cases.yaml
- name: 测试获取用户信息接口
  method: GET
  url: https://jsonplaceholder.typicode.com/users/1
  validate:
    status_code: 200
    json:
      id: 1
      name: "Leanne Graham"
# api_client.py
import requests
import yaml
import logging


class ApiClient:
    def __init__(self):
        self.session = requests.Session()

    def send_request(self, method, url, **kwargs):
        """发送HTTP请求"""
        logging.info(f"发送请求: {method} {url}")
        try:
            response = self.session.request(method, url, **kwargs)
            logging.info(f"响应状态码: {response.status_code}")
            return response
        except Exception as e:
            logging.error(f"请求出错: {str(e)}")
            raise


def load_test_cases(yaml_file):
    """从yaml文件加载测试用例"""
    with open(yaml_file, "r", encoding="utf-8") as f:
        return yaml.safe_load(f)
# test_api.py
import pytest
from api_client import ApiClient, load_test_cases
import logging

# 加载测试用例
test_cases = load_test_cases("test_cases.yaml")


@pytest.mark.parametrize("case", test_cases)
def test_api(case):
    """执行接口测试用例"""
    client = ApiClient()
    response = client.send_request(
        method=case["method"],
        url=case["url"]
    )

    # 断言响应状态码
    assert response.status_code == case["validate"]["status_code"], \
        f"状态码断言失败: 预期{case['validate']['status_code']}, 实际{response.status_code}"

    # 断言响应内容
    if "json" in case["validate"]:
        for key, value in case["validate"]["json"].items():
            assert response.json()[key] == value, \
                f"响应内容断言失败: {key}预期{value}, 实际{response.json()[key]}"

    logging.info(f"测试用例 '{case['name']}' 执行成功")
$ pytest
============================================================== test session starts ===============================================================
platform win32 -- Python 3.13.7, pytest-8.4.2, pluggy-1.6.0
rootdir: D:\Workspace\pytest_study
configfile: pytest.ini
plugins: allure-pytest-2.15.0
collected 1 item

test_api.py::test_api[case0]
----------------------------------------------------------------- live log call ------------------------------------------------------------------
2025-09-12 17:18:35 [INFO] | api_client.py:13 | 发送请求: GET https://jsonplaceholder.typicode.com/users/1
2025-09-12 17:18:35 [INFO] | api_client.py:16 | 响应状态码: 200
2025-09-12 17:18:35 [INFO] | test_api.py:29 | 测试用例 '测试获取用户信息接口' 执行成功
PASSED                                                                                                                                      [100%]

=============================================================== 1 passed in 0.48s ================================================================
4.5 浏览器启动和控制(Edge)
从 Edge 浏览器开发者官网下载和本地浏览器对应的 webdrive,解压出 msedgedriver.exe 放在项目的 drives 的目录下。
import logging

from selenium import webdriver
from selenium.webdriver.edge.service import Service


class WebClient:
    def __init__(self):
        # 指定EdgeDriver的路径
        edge_driver_path = "./drivers/msedgedriver.exe"
        service = Service(edge_driver_path)

        # 初始化Edge浏览器
        self.driver = webdriver.Edge(service=service)
        self.driver.implicitly_wait(10)
        logging.info("Edge浏览器启动成功")

    def quit(self):
        # 关闭浏览器
        self.driver.quit()
        logging.info("Edge浏览器已关闭")


# 测试用例示例
def test_baidu_search():
    client = WebClient()
    try:
        client.driver.get("https://www.baidu.com")
        assert "百度一下" in client.driver.title
        logging.info("百度首页加载成功")
    finally:
        client.quit()
$ pytest
===================================================================== test session starts ======================================================================
platform win32 -- Python 3.13.7, pytest-8.4.2, pluggy-1.6.0
rootdir: D:\Workspace\pytest_study
configfile: pytest.ini
plugins: allure-pytest-2.15.0
collected 1 item

test_web_client.py::test_baidu_search
DevTools listening on ws://127.0.0.1:13897/devtools/browser/38f806a2-1e0d-443b-bf3b-4589ea782089
[14100:19636:0912/174510.079:ERROR:chrome\browser\importer\edge_china_browsers\edge_qqbrowser_importer_utils_win.cc:163] QQBrowser user data path not found.
[7132:39720:0912/174510.247:ERROR:net\socket\ssl_client_socket_impl.cc:929] handshake failed; returned -1, SSL error code 1, net_error -101

------------------------------------------------------------------------ live log call -------------------------------------------------------------------------
2025-09-12 17:45:10 [INFO] | test_web_client.py:15 | Edge浏览器启动成功
[7132:39720:0912/174510.294:ERROR:net\socket\ssl_client_socket_impl.cc:929] handshake failed; returned -1, SSL error code 1, net_error -101
2025-09-12 17:45:13 [INFO] | test_web_client.py:29 | 百度首页加载成功
2025-09-12 17:45:15 [INFO] | test_web_client.py:20 | Edge浏览器已关闭
PASSED                                                                                                                                                    [100%]

====================================================================== 1 passed in 10.52s ======================================================================
4.6 App启动和控制(Appium)
略
评论